Dynamics NAV 2013R2 Excel Buffer Part 1
Table 370 Excel Buffer
This post is the first in a series of three on using the Microsoft Dynamics NAV Excel Buffer, the Excel Buffer in Dynamics NAV is little used in the Standard Object range, if we search for an example to import cells from Excel into a table we only have a few examples, I have seen a number of different “Custom Reports” with different ways of using the Excel Buffer, in this post I will look at some of these methods, discuss and show the way that I prefer to use the Excel Buffer.
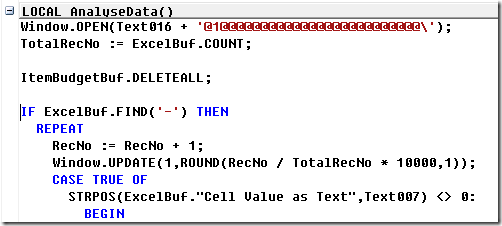
These are the three Excel import objects in Dynamics NAV 2013R2, the code structure in these reports are much the same.
Once the Excel Buffer is populated these reports just do a simple REPEAT UNTIL loop and several Case Statements to set the values.
Excel Workbook
If I have a Workbook which has data and I want to populate an “Item Journal Line” there can be several drawbacks to a Simple Loop, let me look at an Example Excel Workbook, you will find examples in parts 2 and 3 to Import into the Item Journal Line, you can also “Download Object Files” in text format.
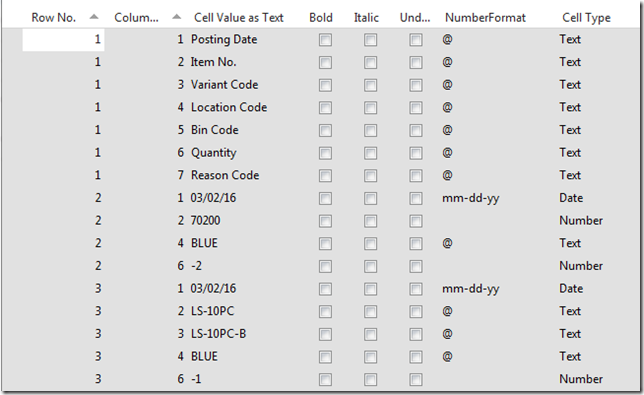
This Example Workbook is just a couple of lines, a generic Workbook to write down stock, I have just two lines, one Item Line, one Item Variant Line, neither line has a Bin Code or Reason Code.
If I import this Worksheet into the Excel Buffer I can see that any Empty Cells are not loaded into the table, row one contains the Seven Column Headers, row two has just Four Columns and row three has Five Columns due to the Item Variant Code.
Record Number Loop or Row Number Loop
If I was to use a Simple Record Number Loop to import this data I would have a couple of issues, the number of columns in each row could be from three to seven columns, I could start a new Item Journal Line using a Case Statement when the Column Number is one, but at what point would I modify the Item journal Line and I only want to add an Item Journal Line if there is a Quantity.
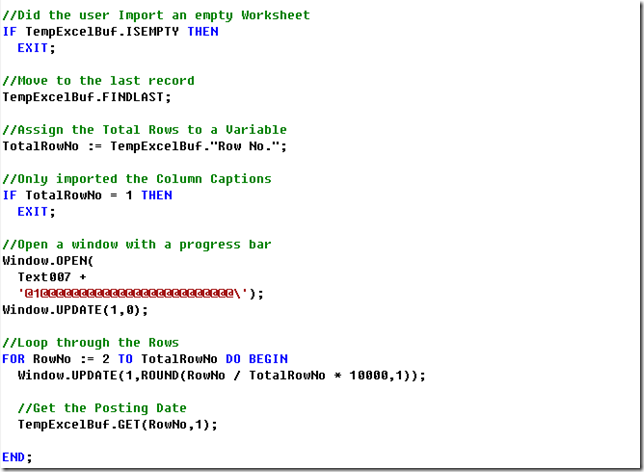
Using a Row Number Loop opens up the process to give me a lot more control, I can retrieve different single Cell Values to test before committing to create and insert a record, to use a Row Number Loop I only have to get the Last Record to Find the Last Row Number and use a FOR “Row Number” Equals Two TO “Last Row Number” DO BEGIN and END, inside the loop I can Retrieve Single Cells in any order.
For a report importing rows into an Item Journal Line I would want to only insert lines that have a quantity, using the Row Number Loop instead of a Record Number Loop gives me the ability to select and retrieve the columns in any order.
Part 2
In Part two I will show how I construct the parts of a report to import data from Excel you can read Part Two Here.


